Studio Redo

I'm very blessed to have an oversized garage. It fits our two cars and then has a generous amount of space for my home studio. We've lived here for two years now and I have truly enjoyed my space, but eventhough I live in the desert of New Mexico, it gets darn cold here in the winter. Another side effect of the dessert is the sand. I live in a literal dust bowl that seems to pile up in our garage and studio as we enter and exit the house.
My studio was a large open space (something that most people would kill for). It had huge solid wood tables seperating my tools from the rest of the garage, but the sand was everywhere and the carbon from my kiln was leaving a layer of black dust all over our rubbermaids. I would freeze at my bench in the winter months huddled next to my space heater trying to warm my fingers. As terrific as it was, it just wasn't practical for my needs.
We considered making a permanent change and building real walls, but the configuration of the garage and a certain window really made it impossible. While our cars would fit, it would make the garage smaller and sizing down might hurt us when it comes time for resale. So, what to do?
We had been given six metal storage shelves as a house warming gift from my parents. They lined the outer walls of the garage. If we could move these to make temporary walls, we could keep the storage space and block my studio from the rest of the space. And that's just what we did!
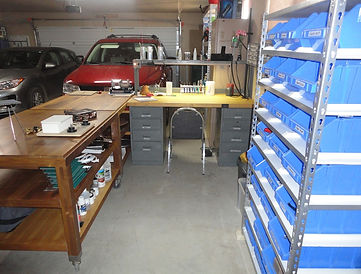

Here's some "before" pictures of my studio. No sorry folks, I'm not a Rangers fan. Those are my hubby's, and this is the only space they're allowed to hang in the house.


This remodel can be done with most brands of metal shelving, and is a fantastic way to add storage to your home while walling off a space for your studio. You will need the following supplies:
--Metal shelving (Mine are 7ft tall x 4ft wide x 18 inches deep. How many you'll need really depends on the size of your space and the size of your budget. They don't all have to match for this to work either, just use what you've got!)
--Hardboard, sold in 8ft x 4ft sheets (Think pegboard without the holes) *available at Lowes and Home Depot for $9 each.
--Nuts, Bolts, and Washers (We used 10 sets per unit. Check sizes of the hole openings for your metal shelves prior to purchasing these.)
--Gorilla Tape (This is tape produced by the Gorilla Glue company. It's black and comes in a nice wide size. It's also a lot stronger than regular duct tape). *available at Lowes and Home Depot for $15 a roll.
--A few basic tools (pencil, drill, screw driver, and pliers)
--Get yourself a helper or two. You're gonna need it for this job.


The first thing you need to do is clear off your already existing shelving, or build your new ones (which ever applies). The sheets of hardboard are 8ft x 4ft and will therefore most likely graze the ceiling of your garage. This is a good thing, as you will have very little room for air to flow and therefore your space will be cleaner and more temperature controlled.
You'll need someone to help hold the sheet of hardboard to the back of your shelving. Mark where you would like holes to be drilled with a pencil. You can either drill with the board standing up, or move it to another space that is easier to drill the holes. After all of the holes have been drilled in the first sheet, insert bolts with two washers (one on each side of the board) and tighten the nuts. You have your first board attached!
You can see in the third photo that there is a significant gap between the wall and the top of the shelving. This is because our garage floor is sloped away from the house for drainage purposes. This gap will lessen as you add items to the shelving, which will also provide plenty of stability.


Continue to attach the hardboard to each of your shelving units and line them up to create walls in your space. As you will see, no matter how hard you try, there will be a small gap between the boards. This is where the Gorilla Tape comes into play. You can use regular Duct Tape, but the Gorilla Tape is much wider. The tape will seal the space off from dust and debris that inevitably flows throughout a garage when you drive in and out.
My studio is walled off on two sides with a "hallway" running down the middle that takes us from our house door to the area where the cars are parked. This hallway is not doored off, so in essence it is still an open space as far as airflow goes. A curatin could be hung from the ceiling to block this off more completely if needed. I've found that the walls are more than enough to keep my space warmer and cleaner, so I've left the hallway open.


You can see the hallway in the picture above. To the left is my kiln space and where I store my clay oven and other "messy" tools. I also have a utility sink for easy quenching and cleaning from the tumbler. The next picture is a view from the other side of my garage. You can see how the same storage I used to have still exists and creates those walls I desperately needed.


This is a view of my firing station and utility sink area. The gray boards on the wall are hardibacker (a cement pressed board). I have these up as an additional safety precaution to protect from the heat of the kiln and clay oven. They are also being held up with the Gorilla Tape as my husband didn't have a cement bit for his drill at the time of this photo.


To the right of the hallway, I have my bench and extra storage. I drilled additional holes in one of the hardboards and inserted pegboard brackets to hold a few of my most used tools. I have my photography cube set up on a shelf that I can wheel my chair up to and start shooting photographs. This makes it easy to get the shots I need right when I need them. My tumbler, dehydrator and a nice big fan sit against the back wall. The fan cools my space in the Summer and the space heater in the middle picture keeps me warm in the Winter. You can see each space is well lit and provides me with plenty of storage for all of my tools.
This project cost me just over $100 (price includes three shelving units that I purchased to hold my tools). It was easy to do and took just one day to set up and organize. And yes, the answer to the question I get the most is, my studio really is always this clean. I believe that a clean studio is a safe studio. Everything has it's place and gets put back at the end of my workday.
I hope you have enjoyed this tutorial and can use the information I've given to help improve your own studio space!